Monday, September 3, 2012

Labor Day BLT's


BLT's have become a tradition for our Labor Day family get togethers at the lake.   This year's rendition was one of the best we have ever had.  My Daughter-In-Law Kristen is the BLT master craftsman.  Each year she tries something new.


This year, nstead of bacon, she made them with pancetta.  The pancetta became extra crispy.


The other components were grilled Italian bread (La Brea Bakery's Italian Round),  crispy artisan lettuce, mozzarella cheese rounds,  and three kinds of heirloom tomatoes from Nana Darla's garden.  The lettuce and tomatoes were drizzled with balsamic vinegar and chopped basil.  It was served open-faced.  To keep everything from sliding off, the layers were added in contrasting textures.  The mozzarella stuck to the lettuce and the tomatoes were placed on top of the ridged pancetta.


We devoured two platters of them and felt no guilt, as they were free of fattening mayonaise and that extra slice of bread.


The holiday was a celebration of the end of summer and it was made even more special by spending it with our family.


Grandson Cameron enjoyed the water and Aunt Kim and cousin Keenan conquered their fear of jumping from the top of the boathouse.


The end of summer at its best!

Tuesday, August 28, 2012

Computer Problems

So sorry, but I am having some major computer issues.  We have our family gathering at the lake over  the Labor Day weekend and I will not have a chance to address the problem until later.  Enjoy the holiday and I will be back soon.

Thursday, August 23, 2012

Roasted Balsamic Cherry and Strawberry Pita Pizzas


Cherries have hit the Farmers' Markets in Western North Carolina recently.  Cherries hold a special place in my heart.  I grew up in Michigan where we were surrounded by orchards full of them.  The lovely sour cherries made delicious pies.  There are so many desserts you can make with cherries, but I have never before used them in a savory dish.  When I found this cherry and strawberry pizza recipe on Ambitious Kitchen's blog, I knew I had to try it.


Roasting cherries and strawberries softens them and concentrates their flavors.  Also included on the pizzas are onions which are caramelized and then splashed with balsamic vinegar.  The pizzas can be assembled on a pita bread crust.  I actually used purchased Indian naan rounds.  The crusts are first sprinkled with mozzarella cheese and then the other ingredients are added.


After the pizzas are baked you can top them with arugula or baby greens and drizzle them with more balsamic vinegar.


Nothing could be easier.  I love fresh cherries. The pizzas made a lovely lunch.  Thinking outside of the box is always a surprise.

Speaking of Farmers' Markets, my good friend and blogging buddy Penny has just begun publishing a food blog called From Harvest to Table.  She has had a wonderful lifestyle blog called The Comforts of Home for several years now.  Because of her interest in local food sources, she has thrown her hat into the ring of food blogging.  Please visit her wonderful new blog and make her welcome.  She is a fabulous cook.

  
ROASTED BALSAMIC CHERRY AND STRAWBERRY PITA PIZZA

3 tsp olive oil, divided
1 small onion, thinly sliced
2 Tbls. balsamic vinegar, divided
1/4 tsp salt
10 Strawberries
10 dark red cherries, pitted and halved
2 to 3 whole wheat pita breads or naans
1 cup mozzarella, shredded
1/2 cup arugula or baby greens
Salt and pepper to taste

Preheat oven to 400 degrees F.  Toss strawberries and cherries in 1 teaspoon olive oil and 1/4 teaspoon salt.  Spread on  a baking sheet and place in oven for for about 10 minutes.

Heat medium saute pan over medium-high heat and add 1 teaspoon of olive oil.  Add onion and stir frequently until onions begin to brown.  Reduce heat to medium-low heat and add 1 tablespoon of balsamic vinegar and a pinch of salt.  Cook 1 more minute and then remove from heat and set aside. 

Place whole wheat pitas on a nonstick baking sheet.  Brush pitas with 1 teaspoon of olive oil and sprinkle with salt and pepper.  Evenly distribute roasted strawberries and cherries, cheese. and onions onto pitas.  Bake for 10 to 12 minutes at 400 degrees F or until edges of pitas begin to turn golden brown.

Top each pizza with arugula and cut into triangles.  Drizzle with additional balsamic vinegar and top with salt and pepper.

Printable recipe  


Monday, August 20, 2012

Biscoff Kiss Cookies


I have three little girls coming to visit soon.  I wanted to make some cookies especially for them.  What better option than these pink sprinkled kiss cookies.  I found the recipe originally on Foodgawker.  It came from  The Cafe Sucre Farine blog.  Thank you to Chris for such a fun recipe.  Take a look at her beautiful cookies.  Mine would have looked better if I had pink food coloring.

What makes these cookies so good is the addition of Biscoff Spread.  It is used in place of peanut butter and I love the flavor.  It is made from biscoff cookies that are made in Belgium by the Lotus Baking Company.  It tastes like a graham cracker spread.  I was surprised that my supermarket carried biscoff spread right next to the peanut butter.


The addition of Hershey's Hugs (kiss) in the center just makes them even more special.  Now I just have to come up with a cookie for the two little boys who will be here.


BISCOFF KISS COOKIES (Recipe from The Cafe Sucre Farine)


Ingredients:
1/2 cup sugar
1/2 cup brown sugar
1/2 cup unsalted butter, softened
1/2 cup biscoff spread or peanut butter
1 egg
1 teaspoon vanilla
1 3/4 cups all-purpose flour
1/4 teaspoon salt
1 teaspoon baking soda
1/4 teaspoon pink gel food coloring
1/2 cup pink sanding sugar
Hershey's hugs unwrapped (recipe called for 48 but I needed only32)

Heat oven to 375 degrees F.

In the bowl of a stand mixer combine sugars, butter and biscoff spread.  Beat on medium speed until light and fluffy.  Add the egg and vanilla and beat for a few minutes more.

Combine salt, flour and baking soda.  Add in 3 additions to bowl of mixer on low speed.  Beat until all is incorporated.

Add pink gel food coloring and mix well.  Add additional pink gel until desired color is achieved.

Shape dough into 1-inch balls.  Roll balls in pink sanding sugar and place balls 2-inches apart of ungreased baking sheet.  

Bake in batch es for 8 to 10 minutes.  Remove from oven and immediately press a Hershey's hug into center of each cookie.  Remove to a rack to cool.


Printable recipe

Thursday, August 16, 2012

Pork Roast and Karma


Please tell me you see the pig sitting upon this pork roast.  I am having a strange feeling about my karma and the pictures I take.  When I photographed this beauty all I saw was a succulent glazed pork roast.  When I looked at the image I saw only a pig.  Why is that pig taunting me?   He looks a little scary.

Seriously though, this was a very good roast for a Saturday when we were both busy with other things.  I decided to cook my bone-in pork loin in the crock pot.  As much as I like my crock pot, I always feel like I need to add extra braising flavor.


I like to brown my roast before I put it in the crock pot.


I then like to deglaze the pan to release all of the browned bits of pork and onion.


After that I put it all in the crock pot with an herb bundle to cook on its own.


Ahh, this is a better angle on the pork roast.  It doesn't look as much like a porky pig.  Just a pork roast right?


But wait.  What is this?  I moved a rabbit planter on the porch after a thunderstorm and this is I what I saw in the accumulated water.  I think I will become a vegetarian.  (Unless I start seeing weird vegetables in my pictures).

Here is the recipe for the pork roast if you dare try it.  A ate the snout first.

CROCK POT PORK ROAST

1 Bone-in Pork Loin Roast
1 tablespoon olive oil
Salt and Pepper to taste
1 onion cut in half and sliced
1 to 2 cups of apple cider
A bundle of fresh herbs (I used thyme and sage)

Salt and pepper roast on all sides.  Heat olive oil in heavy skillet.  Add roast and onions and brown roast on all sides.  Remove roast to crock pot.  Add some of the apple cider to the pan and stir to release all of the browned bits on the bottom.  Add the herb bundle and cook for a few minutes.  Pour liquid into the crock pot with the roast and add the rest of the cider.

Place lid on crock pot and cook roast on high for 1 hour.  Reduce to low and cook an additional 3 hours.
Remove roast and let rest tented with foil for about 5 minutes.  Slice and serve topped with liquid from the pot.

Printable recipe


Monday, August 13, 2012

Grated Potato Galettes - Happy Birthday Julia


Julia Child would have been 100 years old this month.  In honor of the woman who made a nation "be brave in the kitchen", I could not resist becoming a part of PBS's tribute to her.  #CookForJulia  has asked us to cook one of her recipes for the celebration.  I have made so many of her recipes from my collection of her cookbooks; everything from souffles to her signature boeuf bourguignon.   So this time I decided to try something I had never made before.


The Way to Cook was published in 1989, long after the success of Mastering the Art of French Cooking.  It was a cookbook that saw a lot of use in my kitchen.  The concept was simple.  Learn to cook a master recipe and then you can easily tackle any of its variations.  The potato section is a treasure trove of Julia's favorite methods of cooking them.

The grated potato galettes have an interesting background.  Julia first had them at La Tulipe in New York City.  She loved their crisp texture.  When she asked how they were made, the restaurant's sous- chef obliged with the details.  The sous-chef was Sara Moulton.  Two great cooks can't be wrong.


The key to these crispy, buttery potatoes is to steam them just until they are almost done.  Under cooking the potatoes will allow the potato pieces to stick together without additional ingredients.   Then you must refrigerate them until they are cold.  This will make grating them easier.


The underdone potatoes were perfect for grating.


My favorite part of this recipe was the fact that the grated potatoes could be left in a bowl until I was ready to fry them.  I love it when I can prepare dishes ahead of time up to a point.  Because they are almost cooked, they will not turn brown.


I chose to saute my potato galettes on my griddle, but Julia suggests cooking them in batches in a skillet.  Next time I will do it that way because they would absorb more of the buttery goodness from the additional butter needed for each batch.


Join me in cooking for Julia this month.  These tasty potato galettes were worth it.


GRATED POTATO GALETTES

2 to 3 large baking potatoes about 12 ounces each
Salt and freshly ground pepper
1/2 cup or so of clarified butter or olive oil

Cooking the potatoes - several hours or a day in advance:
Scrub the potatoes under hot running water, then steam them for 12 to 15 minutes (mine took 25 minutes), until the potatoes are almost but not quite cooked.  In other words, they should not be floury - after 12 minutes, pierce one with a sharp small knife, which should just penetrate.  Cut one of the potatoes in half crosswise; if there is a raw central core, steam 2 or 3 minutes more.  (If the central core is not cooked through it can discolor!)  Let cool uncovered; the potatoes must be thoroughly cold before you grate them.

Peel the cold potatoes and rub through the large holes of the grater onto a baking sheet or tray.  Toss lightly with a sprinkling of salt and pepper, leaving them loosely massed; set aside until you are ready to continue.

Film a frying pan with 1/8 inch of clarified butter or oil, and, when hot, spread in 1/2 to 2/3 cup of grated potato (the amount depends on how thick a galette you want).  Saute over moderate heat for 4 to 5 minutes, pressing the the potatoes together lightly with a spatula, until the bottom has crusted and browned.  Flip over, and saute to brown the other side a few minutes more.  Transfer to a baking sheet, and keep warm while finishing the rest.  Makes 6 to 8 galettes with 2 potatoes.

Ahead of time note:
The galettes may be sauteed somewhat ahead.  Set aside uncovered, at room temperature.  Reheat briefly in a 425 degree oven.

Another Presentation:
Make a large galette in a 10 or 12 inch pan, and if you don't have the courage to flip, brown the top under the broiler.  After a light browning on the top, you could then sprinkle it with grated Swiss cheese, and brown again.

Printable recipe


Friday, August 10, 2012

Salmon with Swiss Chard and Couscous


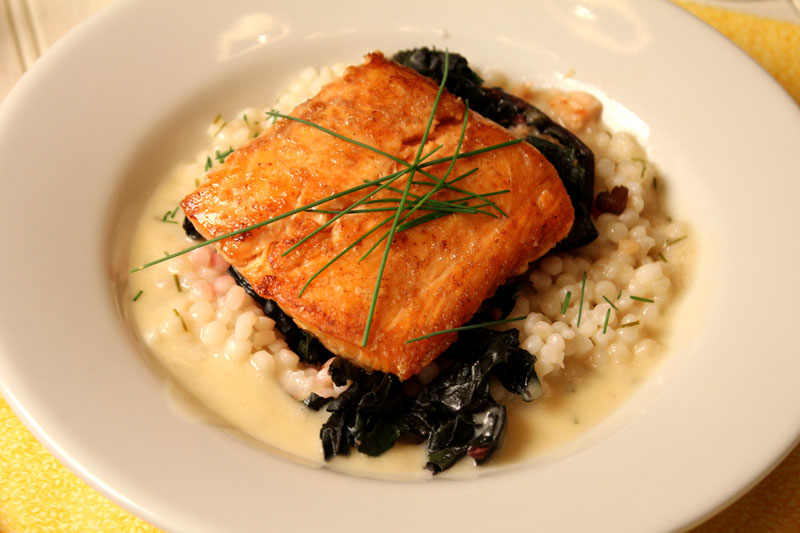
In my last post I mentioned a salmon dish that I had at Fig, a French Bistro in Asheville.  I have been experimenting with it to see if I could duplicate it.  My finished dish is above. Below is the dish at Fig.


There are several steps that need to be done to get this dish on the plate and I had a few obstacles to overcome.  While I was preparing my salmon dish, violent thunderstorms were raging outside the house.  I expected that we would lose power at any second.  When you live in the mountains surrounded by trees, power outages are a regular occurrence, so my focus was a little scattered.

What makes the salmon, greens and couscous come together is the lemon, chive beurre blanc sauce.  I was not happy with the results the first time I made it, but the recipe I used this time was a winner.

You start by reducing wine, lemon juice and shallots.


When the sauce is reduced to a few tablespoons, add cold butter cubes a few at a time.  The sauce thickens to a silky consistency.  Then you add the snipped chives.


You can keep the sauce warm while you precede to the next steps.  For this dish I used red Swiss chard but you could use any of a number of greens; Rainbow chard, kale or micro-greens as was used in the dish when we had it in early Spring.   I like the stems of the red chard so I first sauteed them with some onions.


Add the washed greens and cook until  they are wilted.


I made the couscous next, but did not snap a picture of it.  When all of these components are ready you can begin your salmon.  The technique is very simple but produces great results.  Sprinkle the top of center cut salmon fillets with kosher or course sea salt.  Saute them in an iron skillet salted side down over high heat until they are golden brown.


After they are browned on one side, flip them over and place in the oven to finish cooking for a few minutes.

After that it is just a matter of assembly.  Place the couscous in a bowl, top with the sauteed greens, place the salmon on top and drizzle the beurre blanc around the edges of the bowl.


I was happy with the results.  The salmon was crusty on the top and flaky inside.  The beurre blanc was decadently delicious and we didn't lose power until the meal was completed and the dishes were in the dishwasher.  All and all, it couldn't have been better.


SALMON WITH SWISS CHARD AND COUSCOUS

For theLemon Chive Beurre Blanc:
1 to 2 shallots, chopped fine
1 cup white wine
1/4 cup lemon juice
1 tablespoon heavy cream
1 1/2 sticks cold unsalted butter, cubed
Salt and white pepper to taste
Snipped chives

Add shallots, wine and lemon juice to a saucepan and cook over high heat until it is reduced to about 1/4 cup.  Add the cream and heat until it bubbles.  Reduce the heat to low.  Add the butter a few cubes at a time and whisk on and off the heat until incorporated.  Continue with a few cubes at a time until all of the butter is added and the mixture is fully emulsified and has a creamy consistency.  Season with salt, white pepper and chives.  This will stay warm if you are using it within a 30 minute period.  Just whisk it occasionally.

For the Swiss Chard:

1 bunch of Red or Rainbow Chard
olive oil
1/2 onion, chopped
salt and pepper to taste

Wash the chard thoroughly in a sink full of cold water.  Remove the stems and chop the greens.  Using some of the stems, chop them along with the onion.  Saute stems and onion in a skillet until onion and stems are softened.  Add the drained greens and salt and pepper to taste.  Cover the skillet and cook the greens just until they are wilted.

For the Couscous:

Follow the instructions on the box or cook couscous in a pot of boiling water for about 10 minutes or until it is cooked through.  Drain and season with salt and pepper.

For the Salmon:

2 6 to 8 ounce center cut salmon fillets, skinned
1/2 tablespoon olive oil
1/2 tablespoon unsalted butter
Kosher salt or course sea salt

Preheat oven to 375 degrees F.  Sprinkle salt on top side of salmon fillets.  Heat oil and butter in a skillet over high heat.  Add salmon fillets salted side down and cook over high heat until browned and crisp.  Turn fillets over.  Place pan in oven and roast until they are just flaky, about 5 to 6 minutes.

Assembly:  This dish is best plated in large individual bowls.  Add couscous to each bowl.  Top with greens. Place salmon fillets on top of each.  Drizzle beurre blanc around the edges of the dish.  Garnish with additional chives if desired.

Printable recipe


Sunday, August 5, 2012

A Brief Break


I have been busy . . . so busy lately.  A childhood friend came for a visit.  We had a wonderful time catching up with our respective lives.  We are now in Florida visiting with our friends here.  Because our computer access is tied to our Bright House connection and we will only be here for five days, it did not seem worthwhile to establish a connection.  So David and I are at Starbucks catching up on our emails and blogs.


When I return this week I will be trying to duplicate this wonderful Salmon dish that we had at Fig, a French Bistro in Asheville.  I've had it twice now and was told by our Parisian waiter how it was made.  The Salmon is salt crusted on the top and flaky when cut.  The greens are varied, depending on the season.  The starch is either farro or couscous.  But what remains the same is the lemon chive beurre blanc that pulls the whole dish together.   I have made it once and although it was good, I know I can do better.  Will let you know.  I look forward to catching up with everyone soon.

Friday, July 27, 2012

Pizza Party Tips


I am planning a pizza party for 14 people.  That is a lot of pizzas to make.  The idea is to set out toppings on the kitchen island and let everyone choose their own.  The biggest obstacle to pulling this off is the pizza dough.  It makes such a mess and frankly I don't think I have the space for everyone to flour boards and stretch their own.  Thanks to my Daughter-in-Law Kristen, I have come up with a solution.


I start out with Perfect Pizza Flour Blend from King Arthur Flour.  This is such an easy dough to manage when you are forming your pizzas.  It is a blend of golden durum wheat and unbleached flour with an all-natural dough conditioner and baking powder added for an extra-light crisp crust.  I make my pizza dough in my bread machine.  It is so easy.


Four cups of the pizza flour yields four dough balls for 10-inch individual pizzas.


I pull and stretch the dough on a cornmeal dusted paddle.


Now, this is what Kristen taught me that is so valuable.  Before she tops her pizza with ingredients, she brushes olive oil on the dough and sprinkles it with salt, pepper and Parmesan cheese.


The dough is placed on a pizza stone in a 475 degree oven and prebaked for about 5 minutes.


We now have a crust that will be easy to top and for me that means I can make all of the crusts ahead of time and place them in the freezer until I need them.  On the day of the party, all I have to do is defrost the crusts and assemble the topping ingredients and everyone will be able to build their own pizzas.


Of course we had to test the pizzas to see if they were good.  the two on the right have marinara sauce, mozzarella, sausage, peppers, onions and Parmesan.  The two on the left have the same ingredients, but with pesto sauce instead of the marinara.  Kristen likes to add the mozzarella after the sauce, then the other toppings, then more mozzarella and Parmesan.  She learned that from my Son, who worked in a pizza restaurant while in high school.  She also likes to finish her pizzas with a fresh note like a squeeze of lemon juice or fresh basil.  Thanks Kristen.


Pre-Baked Pizza Crust  (Using Bread Machine)

4 Cups Perfect Pizza Flour Blend from King Arthur Flour or bread flour
1 1/2 teaspoon salt
2 1/2 tablespoons olive oil
1 1/2 cups warm water
2 1/2 teaspoons bread machine yeast or instant yeast

Place all of the ingredients into a bread machine.  Set on dough or pizza setting.  Process until done.  On a floured board, knead dough briefly and cut into 4 pieces.  Roll each into a ball.  Cover with a cloth and let rest for about 15 minutes.

Dust a pizza paddle with cornmeal.  Stretch one of the balls into a 10-inch (approx.) circle.  Brush with olive oil and sprinkle with Parmesan cheese and salt and pepper.

Slide pizza circle onto a pizza stone in a 475-degree oven.  Bake for about 5 minutes.  Remove to a rack.  Proceed with remainder of the dough balls.

When all of them are cooked and cooled. wrap in foil and place in plastic bags.  Freeze until needed.

Allow pizza rounds to thaw to room temperature.  Place your toppings of choice on pizza rounds and bake until browned and bubbly.


Printable recipe


Sunday, July 22, 2012

Barbecued Chicken Sandwiches in the Crock Pot


I know that I have blogged about a similar recipe here.  After you have posted recipes for over 4 years you sometimes find you start repeating yourself.  But seriously, this recipe for barbecued chicken is a bit different that the previous one.

I was inspired by Kayln's Kitchen to make a pulled chicken sandwich again.  Her recipe is very good, using low sugar ketchup, agave nectar, sriracha sauce and pineapple juice.  The only think I borrowed from her was the pineapple juice and the method of cutting the chicken breasts.  Kayln served her sandwiches with guacamole.  I served mine with coleslaw.  Either way they would be great.


I plan to double this recipe for our Labor Day weekend with family.  It will be great for lunch if I start it first thing in the morning in the crock pot.  So easy and so good.


BARBECUED CHICKEN SANDWICHES

3 to 4 boneless chicken breasts, cut in half lengthwise
1 onion cut into fourths
1 1/2 cups ketchup
1/2 cup barbecue sauce
1/4 cup brown sugar
1/4 cup pineapple juice
1 tablespoon Worcestershire sauce
3 tablespoons vinegar
Tabasco sauce to taste
1 teaspoon garlic powder
Salt and pepper to taste

Spray inside of crock pot with cooking spray.  Add chicken breasts and onion.  Mix sauce ingredients and pour over chicken.  Cook chicken on high for 1 hour.  Turn to low setting and cook an additional 2 to 3 hours.  Remove chicken from crock pot and shred with two forks.  Return to crock pot and set on warm.  Serve on heated or grilled buns with coleslaw or guacamole.


Printable recipe

Thursday, July 19, 2012

Chateau Chenonceau on the River Cher


Every castle has a story.  You can feel it in your bones when you explore the magnificent rooms.  The story that Chenonceau tells is one of political intrigue, great love and longing, jealousy and revenge.  Chenonceau has come to be known as "The Ladies' Chateau".


Built in the early 1500's on the site of a demolished fortified castle, Chenonceau is completely surrounded by the river Cher.   It came to be known as the Ladies' Chateau because of the women who called it home.


Diane de Poitiers was the mistress and great love of King Henry II of France.   In 1547 he gave the chateau to her and spent much time there with her entertaining members of the Court.  She had great influence over him and gave him advice about matters of State.  She was both intelligent and beautiful.  Diane was 18 years older than Henry II, but her beauty was such that it only improved with age.  She decorated the rooms and planted a magnificent garden.


Catherine de Medici was Henry II's wife.  She was from a prominent Italian family and was betrothed to Henry when they were both 14 years old.  Part of Italy would fall under French control with their union.  She fell in love with her husband, but he did not return her passion.  Though she bore him 10 children, he preferred the company of Diane de Poitiers.  Henry was mortally wounded in a jousting competition in 1559.  Catherine kept Diane away from his death bed and when he died a few days later, she removed Diane from Chenonceau and took up residence there herself.


She hung her own portrait in Diane's former bedchamber.  The fireplace was designed by Jean Goujon, a French sculptor.  Two Henry II armchairs covered with Cordoue leather flank the fireplace.


The room became Catherine's bedchamber and she decorated the ceiling with the intertwined letters of C and H.   The chamber is beautiful with its two Flanders tapestries.


Catherine designed her own garden adjacent to Diane's garden.  It is a more intimate space offering the "perfect image of refinement".   Upon Henry II's death Catherine became Regent.  Her son and heir to the throne Frances II, at fifteen, acquiesced to her wishes and Catherine ruled France from her rooms at Chenonceau.   They were turbulent times and Catherine's duties were burdensome.  If you would like to learn more about the life and times of Catherine de Medici and Diane de Poitiers, Princess Michael of Kent has written a richly woven history of that time called The Serpent and  the Moon; Two Rivals for the Love of a Renaissance King.   I haven't read it yet, but the reviews say that Princess Michael has a bias in favor of Diane.  From what little I have read of Catherine's life, I would look more kindly on her position.


In the 18th century Louise Dupin was the mistress of the chateau.  The previous years had found the chateau in a steady decline through neglect and the lack of a royal presence.  Louise's husband Claude Dupin, a rich farmer and general, bought the chateau from the Duke of Bourbon.  Louise established herself there, restoring the rooms and grounds.  She was an exquisite creature of the Age of Enlightenment and held salons with the elite among writers, poets, scientists and philosophers.  Her guests included among others,Voltaire and Jean-Jacques Rousseau.


While visiting Chenonceau we saw an exhibit of Rousseau's writings and philsophies.  He had much to say about food and diet.  "On his plate, he refused out-of-season produce, costly and sophisticated preparations and exotic dishes that cost the earth since they had to be transported a long way and sauces that were as complicated as they were indigestible  Everything in moderation.  Meats needed to be grilled and not consumed in excess.  Dairy, fruit and vegetables were strongly advised.  Butter was not used for cooking and salt was scarcely recommended.  Nor were fried food and fat laden sauces.  As for drastic diets, he rejected them, preferring regular exercise.  But it is noted that while at the rich table at Chenonceau he ignored his beliefs about food and put on weight.  Here is another of his beliefs.


Hmmmm.  Very interesting.  His philosophies still have an audience today.  But that's the first time I have heard that eating meat will make you cruel.


One of the accomplishments of Louise Dupin was vital to Chenonceau.  During the French Revolution she was able to save the chateau from being destroyed by the marauding political groups.  The chapel attached to the chateau was stacked high with wood and declared a storage area.  Religious symbols were a target of the movement at that time.  It is ironic that Rousseau, while a guest in the chateau, was preaching the very ideas of equality and justice that almost destroyed the chateau for the Dupin family and generations to come.


During the First World War, Chenonceau was turned into a hospital.  The kitchens were modernized to feed the patients and staff.  That stove is a thing of beauty.


Not much needed to be done to the spit in the fireplace.


The copper pieces were magnificent.  I wanted to take them home.  Do you know what the three legged device is?


I also loved this old ceramic mold.


Today Chateau de Chenonceau is classified as a Monument Historique by the French Ministry of Culture.  It is the second most visited castle in France after Versailles.  That ends our visit to Chateau Chenonceau;  a castle with a long, long story to tell . . . . if you just listen.  This is dedicated to my parents.  Today would have been their 69th wedding anniversary.  They were lucky to have found the love of their lives in each other.